Four benefits of permission schemes in Checklist for Jira
- Louis-Pier
Use Case
- +/- 6 minutes read
To Jira admins, effective control and security measures are extremely important. They help ensure that work is secure from interference and that project tasks can be efficiently managed. This is the reason why permission schemes exist in Jira, and why they are applied to projects.
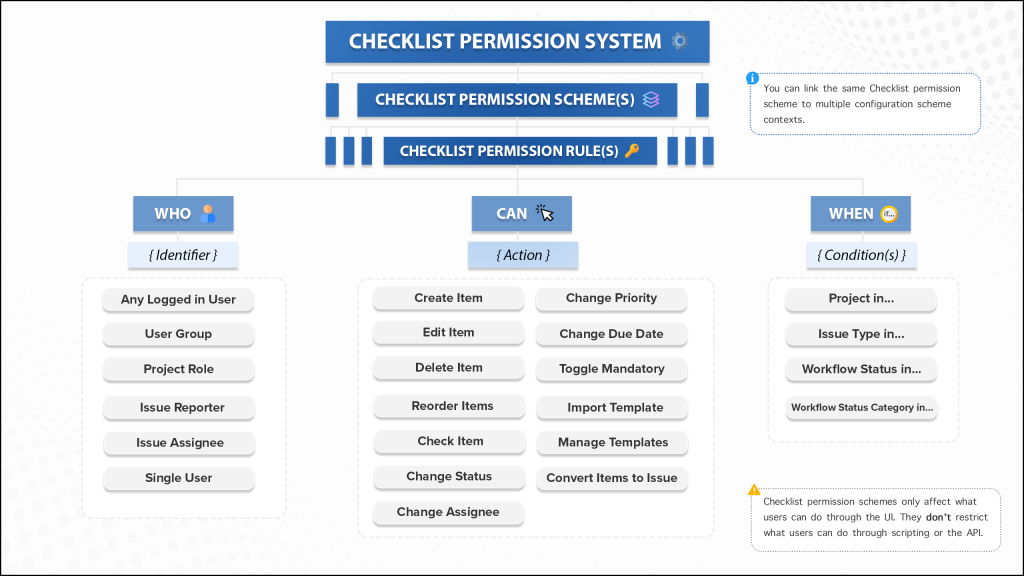
Finding inspiration from Jira’s permission scheme, Checklist for Jira (Data Center) is now introducing its own permission system. The Checklist permission scheme gives fine-grained control over most checklist operations, providing the capability to control who can do what and when. In this blog post, we’ll discuss the benefits of using a permission scheme in Checklist for Jira (Data Center).
This article will outline four benefits of using Checklist permission schemes in Checklist for Jira (Data Center).
Enhanced Security 🔒
Let’s start with the most obvious: not everyone should be able to interact with a checklist. If someone can see an issue, they can automatically see the checklists on it. However, it doesn’t mean that they should start checking items off or modifying the checklists. By assigning specific roles to operations in the Checklist permission scheme, you can ensure that only a select few can interact with the checklist items.
This way, you can protect your work’s integrity while ensuring that only the authorized persons are making changes in your project.
Better Control 🔑
Another key benefit is that you get to stay in control. You decide who can do what and when.
For instance, you can set a wide range of edit permissions, like:
- Editing a checklist (create, edit, delete or reorder items)
- Interacting with a checklist item (check/uncheck item, set status, assignee, priority or due date)
- Interacting with templates
Then, you have the flexibility to decide when these permissions become active by setting conditions on specific:
- Projects
- Issue types
- Workflow statuses
Streamlined processes 🤝
Whether you work in a regulated environment or not, sometimes you need to enforce the processes that are in place. A Checklist permission scheme ensures that only the designated team members can interact with checklist items.
A well-defined Checklist permission scheme also ensures that there is no room for confusion, as team members know who is meant to have access to what, and can streamline their communication accordingly.
Increased Quality ✅
Finally, there will always be potential for mistakes when every team member can access every checklist item. By configuring permission rules, Checklist for Jira (Data Center) makes it clear to members what their tasks are and reduces the possibility of these mistakes happening.
Having the right permissions in place will also help your team members stay engaged by providing a sense of ownership and clarity over their respective tasks. Put simply, when everyone knows what they are supposed to do – when, where, and how – they become more productive and enjoy their work more.
“Nobody can hurt me without my permission.” – Mahatma Gandhi
In Conclusion
To conclude, integrating a Checklist permission scheme into Checklist for Jira (Data Center) can lead to major improvements to your daily workflow.
By ensuring that the right users can interact with checklists, you enhance control, transparency, and clarity, in addition to streamlining workflows and promoting productivity. By integrating a Checklist permission scheme in Checklist for Jira, you ensure that your projects run smoothly in a secured environment.
Try Checklist for Jira (Data Center) to experience these benefits today.
